

昨日、StackStorm(St2)の環境構築について書きました。

St2は様々なアプリやサービスを連携して自動実行するツールで、自動的に動作させたいプログラムと、どのように動作させたいかの定義によって、構成されています。その構造について説明していきたいと思います。

ActionとActionRunner
St2で実行するアプリやサービスはActionとして管理します。”if A then B”のBに相当します。
Actionは何らかのプログラムであり、そのプログラムの実行環境としてActionRunnerがあります。Actionは標準で提供されているものの他に、独自のActionを作成することができます。ActionRunnerは標準で提供されているものから選んで使用します。
ActionRunnerには下記のようなものがあります。(一部)
local-shell-cmdローカルコマンドを実行するpython-scriptPythonスクリプトをローカルで実行するremote-shell-cmdSSH経由でリモートのコマンドを実行するwinrm-cmdWinRM経由でWindowsのコマンドを実行するwinrm-ps-cmdWinRM経由でWindowsのPowerShellを実行するhttp-requestHTTPリクエストを実行するaction-chain複数のアクションを順序どおりに実行する
標準のActionには下記のようなものがあります。(一部)
core.locallocal-shell-cmdを使ってローカルコマンドを実行するcore.local_sudolocal-shell-cmdを使ってローカルコマンドをsudoで実行するcore.remoteremote-shell-cmdを使ってリモートのコマンドを実行するcore.remote_sudoremote-shell-cmdを使ってリモートのコマンドをsudoで実行するcore.sendmaillocal-shell-cmdを使ってメールを送信するcore.httphttp-requestを使ってHTTPリクエストを実行するcore.winrm_cmdwinrm-cmdを使ってWindowsのコマンドを実行するcore.winrm_ps_cmdwinrm-ps-cmdを使ってWindowsのPowerShellを実行する
このように、ActionRunnerは実行環境であり、それを使って(その上で)Actionに定義されたコマンド等を動かすということがわかると思います。もちろん、local-shell-cmdというActionRunnerを使って、独自のシェルスクリプトなどを動かすActionを定義したりすることもできます。python-scriptというActionRunnerはPythonの実行環境を提供するものです。Pythonスクリプトを動作させるための仮想環境(virtualenv:仮想環境ごとに異なるパッケージを導入することができる)は、Action単位ではなくActionやTriggerなどをまとめたPackの単位で構築することができます。
St2の定義ファイルはyaml形式で、Action(core.local)の定義はこのようなものです。
---
description: Action that executes an arbitrary Linux command on the localhost.
enabled: true
entry_point: ''
name: local
parameters:
  cmd:
    description: Arbitrary Linux command to be executed on the local host.
    required: true
    type: string
  sudo:
    immutable: true
runner_type: "local-shell-cmd"
TriggerとWebhook、Sensor
TriggerはActionを呼び出すためのきっかけとなるもので、”if A then B”のAに相当します。
標準のTriggerには、下記のようなものがあります。(一部)
core.st2.CronTimercore.st2.DateTimercore.st2.IntervalTimercore.st2.action.file_writencore.st2.sensor.process_exitcore.st2.webhooklinux.file_watch.line
CronTimer、DateTimer、IntervalTimerは時間に関するTriggerです。CronTimerでは、UNIX系OSで用いられるCronと同じように日時やその間隔を定義することができます。
webhookは外部からのWeb APIによる呼び出しを処理するTriggerです。後で説明するRuleの定義は不要で、直接Actionを実行できます。(St2APIを使用すればActionを直接起動することもできるので、Webhookはその一種のようにも見えます。)
file_writenやfile_watch.lineのようにファイルの生成や更新を監視できるTriggerもあります。また、process_exitはシステムプロセスの終了を監視します。
Sensorは外部システムなどの監視を定期的に行って、Triggerを呼び出すPythonスクリプトです。
標準では、linux.FileWatchSensorが提供されています。このSensorの定義の内部で、先ほど例示したlinux.file_watch.lineというTriggerが定義されており、SensorのPythonスクリプトから定義されたTriggerに処理を呼び出します(ディスパッチ)。
StackStorm Exchangeで提供
---
  class_name: "TwitterSearchSensor"
  entry_point: "twitter_search_sensor.py"
  description: "Sensor which monitors twitter timeline for new tweets matching the specified criteria"
  poll_interval: 30
  trigger_types:
    -
      name: "matched_tweet"
      description: "Trigger which represents a matching tweet"
      payload_info:
        - "id"
        - "created_at"
        - "lang"
        - "place"
        - "retweet_count"
        - "favorite_count"
        - "user"
        - "text"
        - "url"
Rule
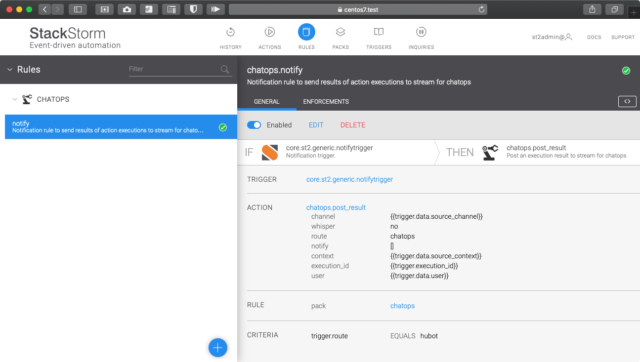
最後にRuleです。Ruleは上のキャプチャで見ると分かるように、”if A then B”を定義して、TriggerとActionを紐付けます。定義ファイルは下記のようなものです。core.st2.generic.notifytriggerというTriggerが起動した場合、criteriaで指定された条件を満たしていれば、actionに定義したActionを実行します。
---
name: "notify"
pack: "chatops"
enabled: true
description: "Notification rule to send results of action executions to stream for chatops"
trigger:
  type: "core.st2.generic.notifytrigger"
criteria:
  trigger.route:
    pattern: "hubot"
    type: "equals"
action:
  ref: chatops.post_result
  parameters:
    channel: "{{trigger.data.source_channel}}"
    user: "{{trigger.data.user}}"
    execution_id: "{{trigger.execution_id}}"
    context: "{{trigger.data.source_context}}"